Exercise 17: Multiple points
(6 photographs)
With several points the relationships are not so predicable. A group of objects implies a network of lines, and can also create a shape - again by implication. In still-life photography, one of the basic skill is to be able to group objects together in such a way that they are linked attractively, in a relationship that is active rather than obvious and static. This is essentially a problem of placing several points.
Set up your own still-life, with a background that is unfussy but not entirely plain. Use between six to 10 similar-sized objects, each compact in shape. You should fix the camera firmly in one position, aimed down at the background (ideally, use a tripod). The idea is to control the composition by rearrangement, not by changing the framing with the camera.
Begin by placing one object; make a record of this by taking a photograph. Then add the second, then the third, and so on; each time, take one photograph. T he aim is to produce a final grouping, which is not so obvious as to be boring (avoid regular shapes), but which hangs together visually. The process will take some time, if you give it proper thought
Consider each move and the effect that each new addition has on the overall grouping, you will almost certainly have to re-adjust object that you have already placed, and my change your mind several times. This is perfectly normal in still-life photography.
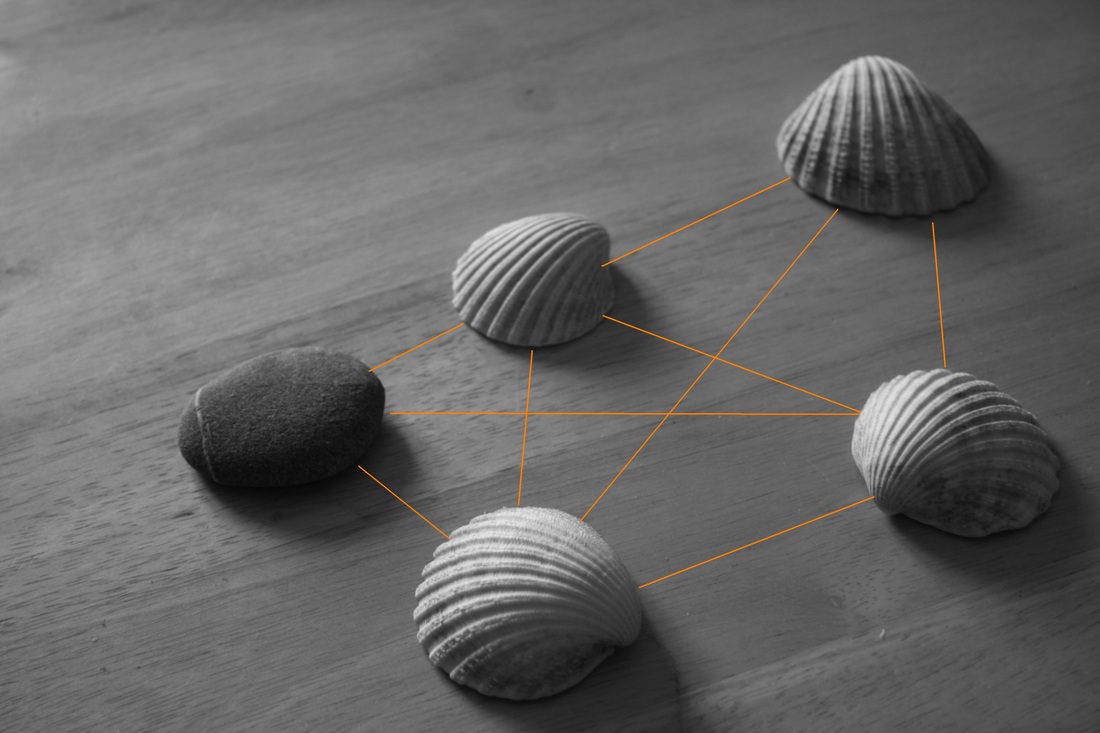
When you have finished, you will have a blow-by-blow sequence of photographs that records your decisions. For the final photograph draw a sketch, indication the ´lines´that relate the objects, and any basic shape or shapes that they form.
With several points the relationships are not so predicable. A group of objects implies a network of lines, and can also create a shape - again by implication. In still-life photography, one of the basic skill is to be able to group objects together in such a way that they are linked attractively, in a relationship that is active rather than obvious and static. This is essentially a problem of placing several points.
Set up your own still-life, with a background that is unfussy but not entirely plain. Use between six to 10 similar-sized objects, each compact in shape. You should fix the camera firmly in one position, aimed down at the background (ideally, use a tripod). The idea is to control the composition by rearrangement, not by changing the framing with the camera.
Begin by placing one object; make a record of this by taking a photograph. Then add the second, then the third, and so on; each time, take one photograph. T he aim is to produce a final grouping, which is not so obvious as to be boring (avoid regular shapes), but which hangs together visually. The process will take some time, if you give it proper thought
Consider each move and the effect that each new addition has on the overall grouping, you will almost certainly have to re-adjust object that you have already placed, and my change your mind several times. This is perfectly normal in still-life photography.
When you have finished, you will have a blow-by-blow sequence of photographs that records your decisions. For the final photograph draw a sketch, indication the ´lines´that relate the objects, and any basic shape or shapes that they form.


My feedback
As you see above I done a little bit more than the requested 6-10 photograph. I try out difference thinks and learn a lot from this exercise.
I first went to the beach and collected the items I could use for this exercise. The same day on the beach I done practise for other exercises.
I placed the object on a table in my livingroom. I had to do it during the day as I like to this exercise with daylight.
Because I read the book ´a photographers eye´. I came with the idea to also place the subject in a line. I saw exsamples in the book and I also wanted to included that into this exercise.
I see now that changing the items, add items, removing items the photograph change a lot. It is very important to find out where you can place the items and how many items you should have on the photograph. It is very clear on my photographs that you need at least three items. Otherwise I think the photograph is very borring.
After this exercise I will do some more practise on my own as I really enjoyed it.